Diagnostic Guide
Why Is My Sink Leaking From the Drain?
A sink drain leak may start at the flange, drain body, tailpiece, slip joint, or P-trap. Find the highest wet point before deciding what failed.
Short answer
What it usually means
If water is escaping from the sink's drain assembly, it may be coming from the drain body or flange seal, the tailpiece connection, a slip-joint washer, a P-trap connection, or a cracked or corroded component. Do not assume the part producing the final drip is the failed part. Water often runs down the outside of the assembly before it falls. Dry everything, use a small controlled amount of water, and find the highest point that becomes wet first. If the area gets wet while the faucet runs even when water is not entering the drain, the source may instead be the faucet, a supply line, or a shutoff valve.
First, determine whether the drain is actually leaking
The cabinet floor does not identify which system released the water. A drainage leak usually appears when water enters the drain opening or piping below. A faucet, supply line, shutoff, sink rim, disposal, or dishwasher connection can wet the same cabinet without the drain being at fault.
Start with timing. If the plumbing stays dry while the faucet runs without water entering the sink drain, but becomes wet when water is released through the drain, the drainage assembly becomes more plausible. Stop as soon as the first wet point is visible.
| When the water appears | What that pattern may suggest |
|---|---|
| Only while water drains | Drain body, tailpiece, slip joints, trap, or another drainage connection |
| While the faucet runs even when water does not enter the drain | Faucet body, supply connection, supply line, or shutoff rather than the drain |
| After the basin holds water, before the stopper is released | Upper drain/flange sealing area or another basin-side path may deserve attention |
| Only when a full basin or large flow is released | A joint may leak only under greater flow, movement, or temporary backup; location still matters |
| Without anyone using the sink | A pressurized supply leak, condensation, cabinet spill, or another nearby source may be more likely |
Find the highest wet point—not the lowest drip
Gravity makes leak diagnosis sneaky. Water escaping beneath the basin can cling to the drain body, run along the tailpiece, cross a nut, and finally drip from the bottom of the P-trap. The trap may be where the drop lets go, not where the leak began.
Remove stored items, place a towel or shallow container below the piping, and dry every visible surface. Watch the underside of the basin first, then work downward under a small controlled flow. A dry paper towel touched to each accessible connection can reveal moisture before a drop forms. Stop once you identify the highest wet point.
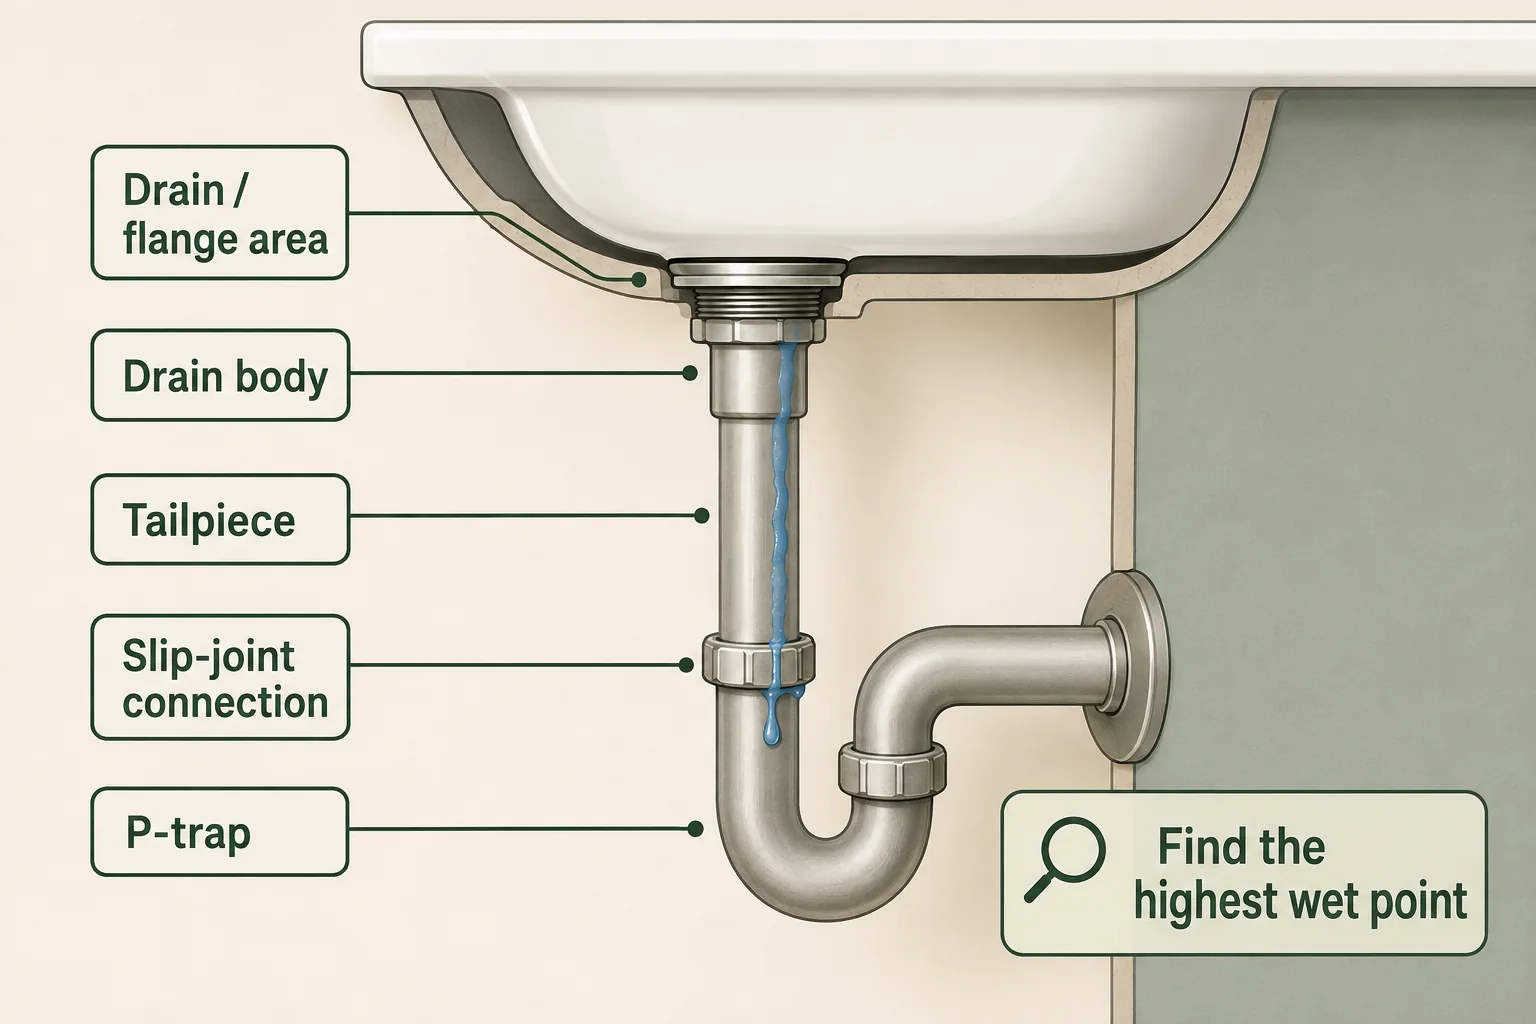
Where is the water starting?
Use the first wet surface as a clue, not as a final diagnosis. Common drain assemblies differ, and a connection hidden behind a nut or gasket may require disassembly by someone familiar with that specific setup.
Directly beneath the sink basin
Moisture beginning at the underside of the drain opening points toward the drain body, its upper flange seal, an underside gasket, or the connection holding the assembly against the basin. The flange is the visible rim around the opening; the drain body passes through the sink. Water from here can coat everything below. Sealing methods vary, so putty, silicone, supplied gaskets, and tightening instructions are not interchangeable.
Where the tailpiece connects
The tailpiece is the straight tube from the drain body toward the trap. Its upper connection may be threaded, gasketed, integral, or configured another way. A loose connection, failed seal, damaged part, or misalignment can leak here. Confirm moisture did not begin above it.
At a slip-joint nut
Many removable tubular drains use a nut and tapered slip-joint washer. The washer—not tape wrapped around the threads—makes the water seal. A displaced, reversed where orientation matters, damaged, or poorly seated washer can leak, and angled tubing can prevent an even seal. Hardware and washer direction vary, so follow the product instructions.
At the P-trap
The P-trap is the curved section that holds a water seal between the room and drainage system. It commonly connects to the tailpiece and a trap arm toward the wall. Moisture at either joint may involve a washer, alignment, or damaged hardware. Water on the bend may also have traveled from above; the drip location does not prove the trap body failed.
On the middle of the tailpiece or trap body
Dry the surface and look above it first. If moisture truly emerges from the tube, plastic may be cracked or metal corroded. A failed connection at either end can imitate a tube-wall leak.
Every component is wet
Dry the assembly and reduce the water volume. Watch from the basin downward instead of staring at the familiar drip. If the source stays hidden, do not increase the flow; photograph the pattern for a plumber.
When it leaks adds a second diagnostic clue
It leaks only while the sink drains
That timing supports a drainage-side source because the drain body, tailpiece, trap, and their connections are carrying water. It does not identify which joint failed. Start at the basin and locate the first wet point.
It leaks while the faucet runs, even without drainage flow
The faucet or pressurized supply side may be responsible. Water can travel along supply tubing, faucet mounting hardware, or the underside of the basin and then drip onto the drain. Keep this article's drain diagnosis separate from a leaking supply line, shutoff, or faucet connection.
It appears after the basin has held water
If the underside of the upper drain assembly becomes wet while the stopper holds water, the flange or drain-body sealing area becomes more relevant. If everything remains dry until the stopper is released, watch the tailpiece and joints as the larger flow moves through them. This comparison is a clue, not proof; overflow passages and sink designs vary.
It leaks only with a large volume
A joint may pass a slow trickle yet leak when a full basin is released. Greater flow can expose a marginal seal, misalignment, movement, or drainage restriction. Avoid repeating a high-volume test after the leak appears, especially if the cabinet cannot contain it.
How the drain parts fit together
The drain flange surrounds the opening inside the sink. The drain body passes through the basin and seals with the model's specified gasket, washer, nut, putty, or sealant. A tailpiece carries water toward the trap. Removable sections often meet through slip joints; other portions may be threaded, permanently joined, or part of a disposal or strainer.
Leaks develop when a seal is loose, damaged, displaced, or incorrectly assembled; when tubing pulls a joint out of alignment; or when a component cracks or corrodes. The wet point identifies the zone; the product and sink instructions determine the repair.
- 1Drain-body seal no longer holds
The flange-side seal or underside gasket may be damaged, incorrectly seated, incompatible with the sink material, or no longer compressed. Repair may require removing and resealing the drain body according to its instructions.
- 2Tailpiece connection has loosened or failed
A threaded or gasketed connection at the bottom of the drain body can leak. The exact seal depends on the drain design, so do not assume the remedy used for a slip joint applies here.
- 3Slip-joint washer is not sealing
A washer can be damaged, cocked, missing, or oriented incorrectly for that fitting. Alignment matters because the tube and fitting must meet without forcing the washer unevenly.
- 4Tubular parts are misaligned
A trap pulled sideways can stress its joints. Tightening harder does not correct incompatible lengths, offsets, or damaged parts.
- 5A component is cracked or corroded
Plastic can split near a nut or stressed section; thin metal can corrode and develop holes. Replacement is generally more reliable than coating a failed drainage component with an improvised leak product.
What you can check safely
- Empty the cabinet and protect stored items before running water.
- Place a towel and shallow container below the assembly, then dry all visible parts.
- Use a flashlight and inspect from the underside of the basin downward.
- Run a small amount of water and use a dry tissue or paper towel to locate the first moisture.
- Compare filling, holding, and draining only when the stopper and basin can be used without overflow.
- Look for a visibly loose nut, an off-angle tube, a cracked plastic fitting, or corroded metal without dismantling the system.
- If a familiar slip-joint nut is loose, a gentle hand check may be reasonable; do not force it or tighten everything blindly.
- Photograph the highest wet point and note whether a small flow or only a full-basin release produces leakage.
Four common leak-finding mistakes
“The P-trap is dripping, so the trap must be bad.”
Not necessarily. Trace upward. Water often follows the tailpiece and trap before falling from the lowest surface.
“I'll tighten every nut.”
More force can deform a washer, damage plastic threads, or crack a fitting. A joint that is misaligned or contains a damaged washer needs the correct condition restored, not indiscriminate torque.
“Thread-seal tape will fix the slip joint.”
A typical tubular slip joint seals at its tapered washer, not at the nut threads. Tape around those threads does not correct a damaged, displaced, or misaligned washer. Other threaded drain connections may have different manufacturer requirements.
“Every flange uses plumber's putty.”
Drain instructions differ. Some specify putty or another sealant, some permit silicone, and some plastic or stone-compatible installations warn against certain putties. Use the drain, sink, and sealant manufacturers' directions.
Kitchen and bathroom sink drains are not identical
A bathroom sink may use a pop-up drain with a pivot rod and overflow passage. A kitchen sink may use a basket strainer, disposal, two bowls, dishwasher connection, or another layout.
The diagnostic method still applies: separate supply-side water, dry the assembly, use a controlled flow, and find the highest wet point. If water begins at a disposal, dishwasher hose, basket strainer, faucet, or pressurized supply connection, use configuration-specific guidance rather than treating it as a tailpiece or P-trap leak.
When to stop using the sink and call a plumber
Stop using the sink when leakage is substantial, a container cannot reliably catch it, cabinet materials are swelling, water is reaching flooring or the room below, or electricity is nearby. Remove standing water, protect stored items, and dry wet cabinet surfaces promptly. Long-term staining, softness, swelling, or persistent odor can indicate that the leak has been active longer than the visible drip suggests, but damp material alone does not prove mold.
Call a plumber when the source stays hidden, the drain body needs removal or resealing, metal is corroded, plastic is cracked, glued drainage is damaged, the layout is unfamiliar, or a corrected user-serviceable joint still leaks. A plumber can match parts, correct alignment, and test the assembly safely.
If multiple fixtures are slow, gurgling, rising, or backing up, the problem may extend beyond this sink's joint. Wastewater backup or sewage odor with poor drainage deserves prompt plumbing evaluation and limited fixture use.
When more than one fixture reacts, use Why Do Multiple Drains Back Up at the Same Time? to compare a shared branch with a broader building-drain, sewer, or septic problem.